

Background
In 2017 I worked with Nick Andrews and Heidi Noordijk at the North Willamette Research and Extension Center (NWREC) to help them develop a small wash and pack area to go with their Organic vegetable learning farm. The work was funded by a Clackamas Extension Innovation Grant. Part of the project was to design a few essential pieces of “furniture.”
I designed and built prototypes for three pieces and the packing table shown above is the first one I’m writing up here. You can find the write up for the packing table here, and one for the adjustable height spray table here.
The intention for the packing shed goes beyond just creating a functional space for packing vegetables out of the trial field, it’s also meant to be a testing ground for equipment, and a demonstration and teaching space for new and continuing farmers.
Basic Design
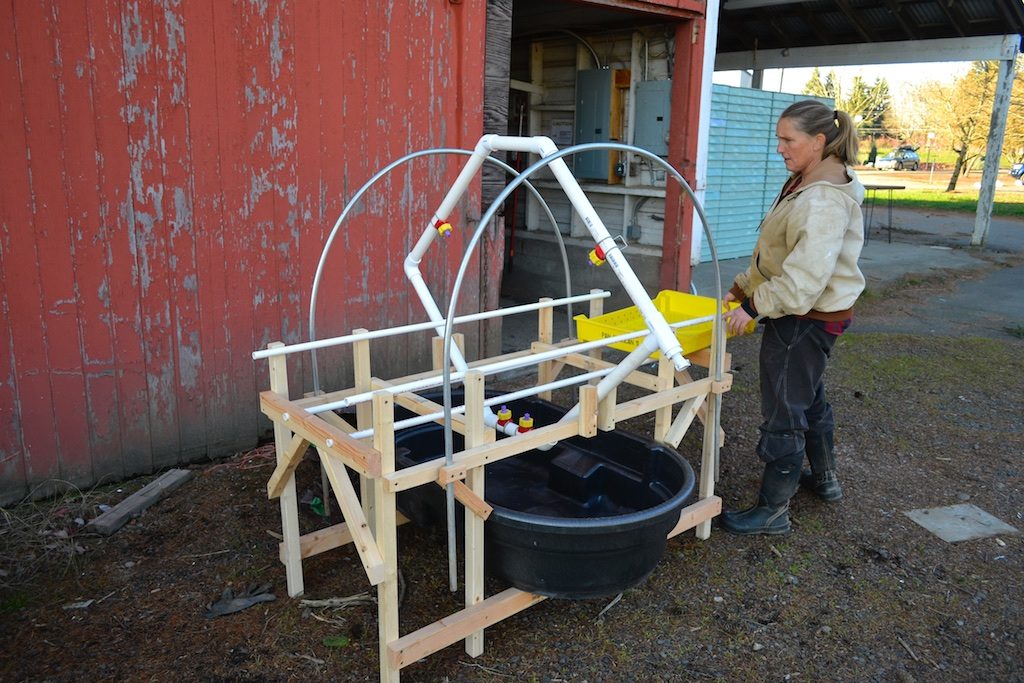
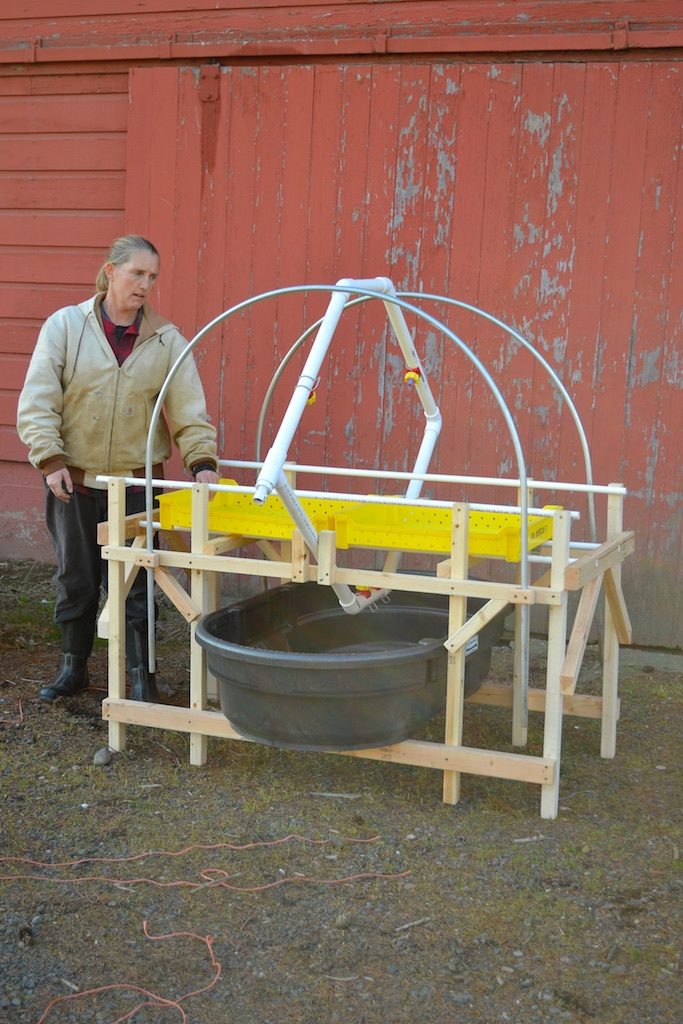
The initial request for this piece of furniture was to develop a way to wash totes quickly and easily. The preference was for a feed through design and site limitations required a design with water flow limited to 12 gpm, and no power.
There are several commercial options available that fit the criteria of feed through, but they all have power requirements to run conveyor chains and pumps. Roeters Farm Equipment in Michigan sells two different chain conveyor washers for $4100-6000 that are designed for washing vegetables but are also being used by growers for washing totes. HarvestLugs.com sells a dedicated lug washer for about $18,500. They estimate it takes 2 people to operate the machine and it can wash 60-70 lugs a minute.
The prototype design for this simpler tote washer also requires two people to operate efficiently, with one loading the dirty totes and one emptying at the far end. There are PVC pipe rails that the totes slide on, upside down, and they pass through a tunnel where four spray nozzles are directed to spray all of the surfaces of the lugs before coming out the other end.
Below the rails and spray nozzles is a stock tank to catch and redirect the water and dirt coming off of the lugs. Water is fed into the system by a standard ¾” hose.
On a side note, this design could be used to pre-rinse vegetables in totes by running totes with good drainage full of vegetables through it.
The following short video shows the first trial of the tote washer.
Construction Details
The basic design is a light weight wooden frame that supports the stock tank, the rails above the tank, the spray nozzle manifold and metal hoops that hold up a tarp to contain the spray.
The frame pieces were cut with a circular saw but any saw could be used. Holes were primarily cut with forstner drill bits and a drill press which make some of the larger holes easier to cut, especially in the PVC which has a tendency to crack with other types of large drill bits, especially when they are fed too fast and the pipe isn’t solidly clamped while drilling.
| Part | Description | Source | Price |
| 2×2 | Two 8’ lengths for frame | Lumber Yard | $5 |
| 2×3 | Seven 8’ lengths for frame | Lumber Yard | $15 |
| ½” PVC pipe | 20’ for sliding rails | Plumbing Supply | $9 |
| 1 ¼” PVC pipe | 10’ for sprayer manifold | Plumbing supply | $9 |
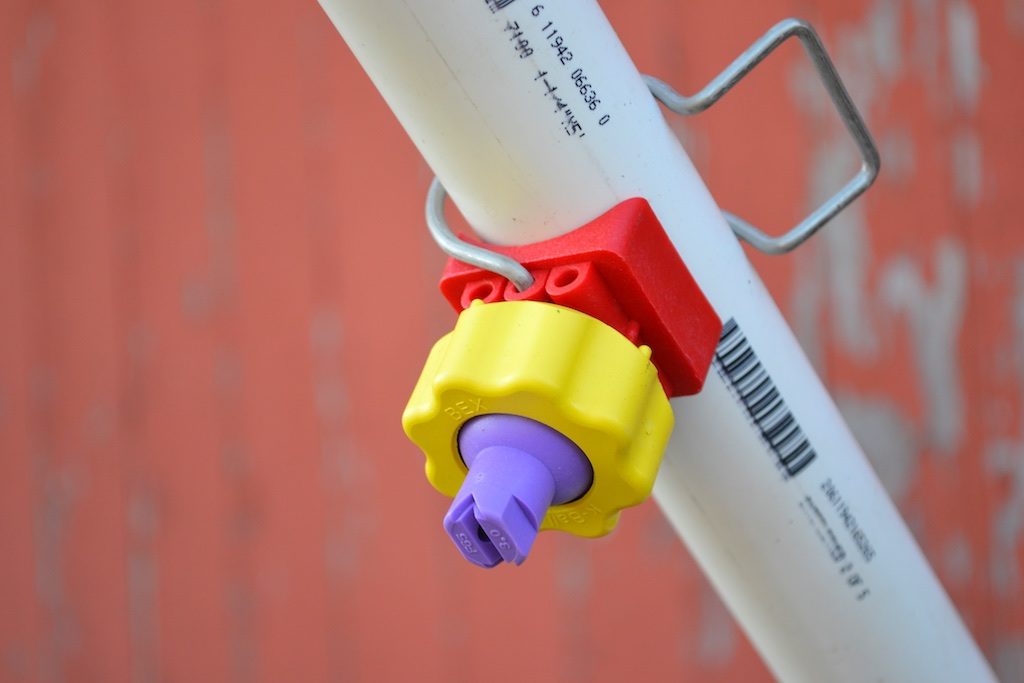
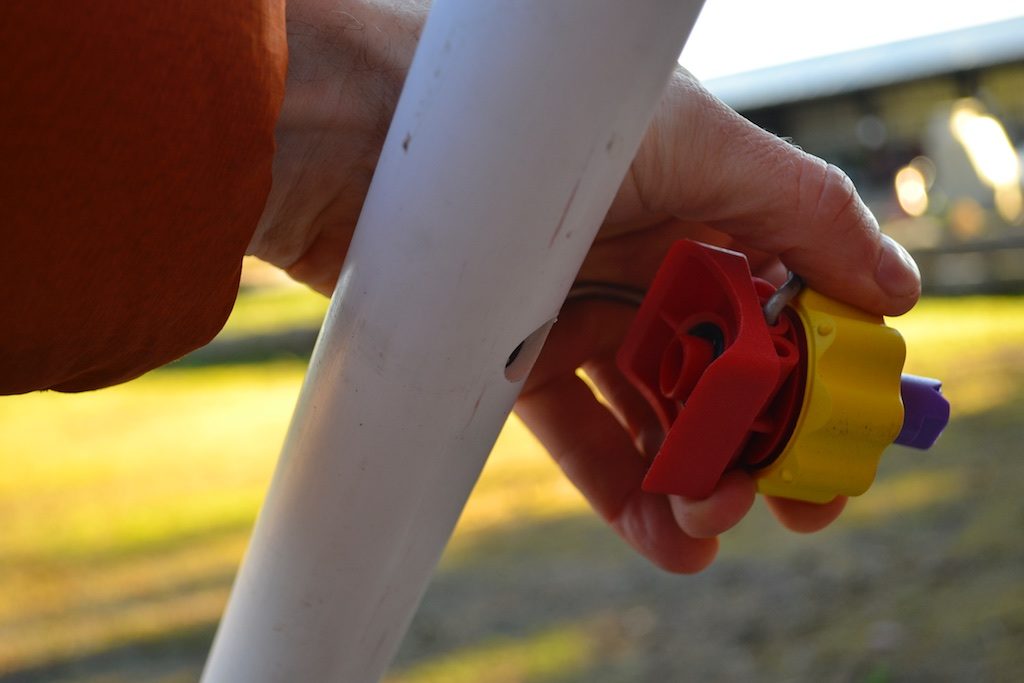
| 1 ¼” PVC 45 fittings | 4 for sprayer manifold | Plumbing supply | $5
|
| 1 ¼” PVC 90 fittings | 1 for sprayer manifold | Plumbing supply | $2 |
| 1 ¼” PVC tee fittings | 1 for sprayer manifold | Plumbing supply | $2 |
| 1 ¼” Slip to ¾” FPT PVC bushing | 1 for sprayer manifold | Plumbing supply | $1 |
| ¾” FHT to MPT adapter | 1 for sprayer manifold | Plumbing supply | $2 |
| K-Ball Nozzles | Purple 0.129 orifice clip on nozzle | US Plastic Corporation | $33 |
| ½”EMT conduit | 2 10’ lengths | Hardware store | $6 |
| Spring Clamps | 6 for attaching tarp to conduit | Hardware store | $3 |
| Tarp | 5×7’ tarp | Hardware store | $4 |
| Stock Tank | Rubbermaid 50 gallon stock tank | Farm Supply | $80 |
| Bath waste pipe | basic drain for bath tub | Hardware store | $20 |
| Screws | 2 ½” deck screws for framing, 1 ½” for attaching PVC rails | Hardware store | $5 |
| Approximate parts TOTAL | $201 |
I’m not providing the actual dimensions for the frame as it was built for a couple of reasons but I do think explaining the basic method might be useful so I am detailing that. The main reason I’m not providing the dimensions is that I don’t actually think the prototype is a good size now that it’s actually built. It is a nice, light weight, and feels very solid so the idea was good, but the outside rails are set to wide. (I have more recommendations for changes below in the Potential Future Improvements section.) Here are the basics of how I put the frame together.
Cut all of the frame pieces to size and then screw them together, drilling pilot holes to avoid splitting the wood. I used a circular saw and cordless drill but any saw and drill will work. Quick clamps and a square help with assembly, especially when putting the frame together solo.
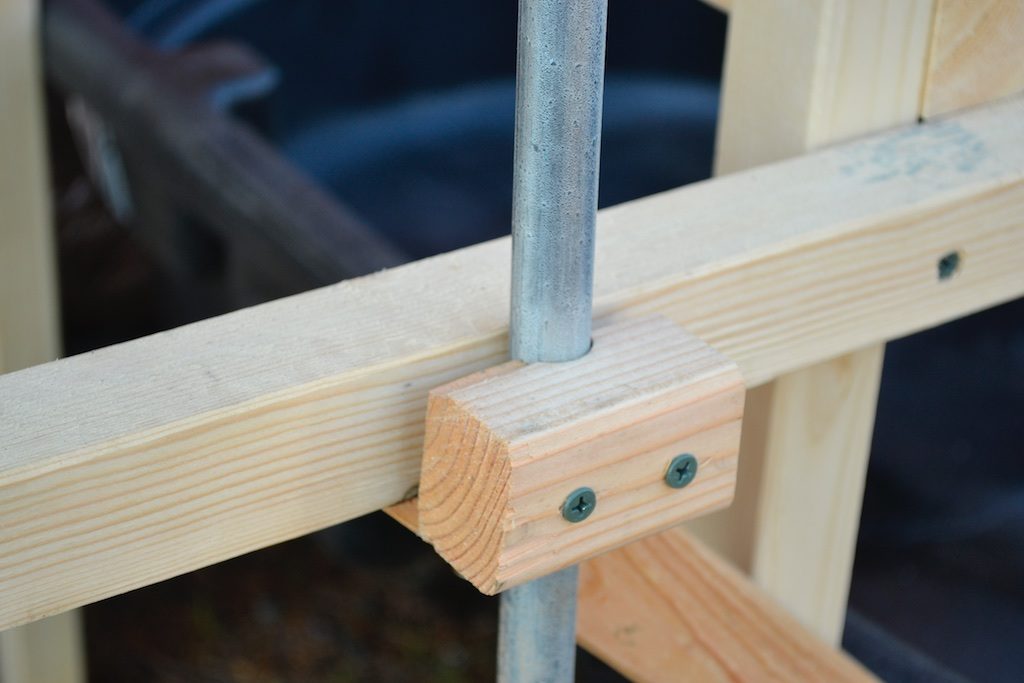
I used a quick hoop bender from Johnny’s to make the two conduit hoops (these were actually just taken from an existing supply on the farm). A separate wooden frame could also be used, or a bender can be made from scrap wood. To clamp the hoops to the frame I drilled holes that approximated the diameter of the conduit into 2×2, then ripped the wood lengthwise and cut off the individual clamps. I also drilled holes for the screws to slide through.
The manifold is all set up with press fit joints and no glue. These could be glued if they start separating, but leaving them unglued allows the manifold to be easily removed and modified if needed, or even cleaned on the insides. I drilled the holes in the manifold for the clip on nozzles using a forstner drill bit and a drill press, and going slowly. PVC is prone to cracking when drilling holes so it helps to go slowly and steady with a drill press but it is possible to drill the holes manually with some care.
The tarp is just clamped to the hoops which makes it easy to remove.
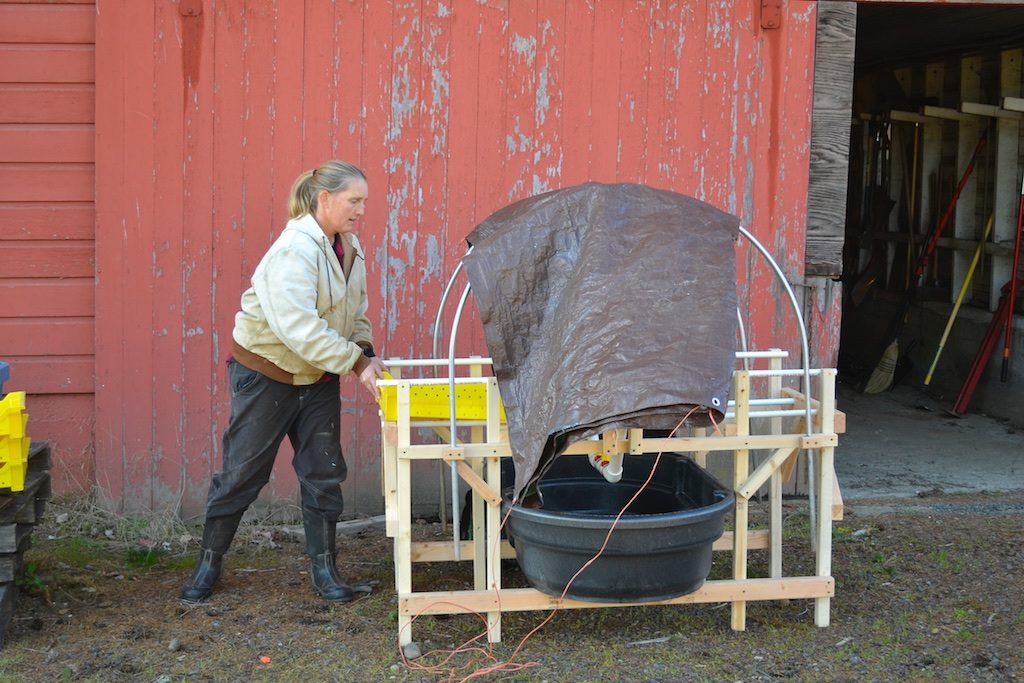
Holes for the drain in the tub are drilled using hole saws and the tub simply sits in the frame. A standard bathtub drain kit can be installed in the bottom of the stock tank to provide drainage and direct the water away from the work area.
Potential Future Improvements
My hope was that this washer would be strong enough to clean the majority of dirt and debris off of used harvest lugs. The reality is that it will rinse them off well, but multiple passes and manual brushing is still required for totes with any significant soil and debris attached.
In limited testing it is still marginally faster than manually washing lugs, and much more ergonomic. It also contains the water well, allowing the wash water to be diverted away from the work area. The rails actually provide a good support for scrubbing out lugs, but the continuous water flow wastes water while lugs aren’t passing through.
A knee or foot valve would be an easy way to save water, but it would add significant expense, most likely in the neighborhood of $100 or more and it might reduce the water flow. A larger chain operated valve might allow more flow but would require creating a separate lever mechanism and would be more expensive.
This basic design could be easily modified to work with a single user. I think adding a foot, or knee operated valve, using a single fixed spray head directed down and slightly away from the user and into the tub would be a good set up. Using the sliding rails simply as a table to place the bin on while scrubbing and then manually moving the lug under the spray as the water is on would keep the water relatively contained, and allow access to all edges of the lug.
With the current configuration one design improvement might be making most of the manifold from smaller diameter pipe and reducing the amount of pipe above the bottom nozzles. The shut off valve should also be moved closer to end where one of the users can easily turn it on and off. This would reduce the amount of water and time that it takes to fill the manifold, not insignificant with the current design. It would also reduce the amount of water than drains from the nozzles between uses. Changing the nozzle types might also help. All of these changes would add materials costs.