Setting Up a Basic Tool Bar for Your Tractor

Hilling Potatoes is one of the easiest tractor cultivation jobs to start with and it’s incredibly effective.

Lots of small farms I know, including many I’ve worked on, use a small tractor to mow and till, but do all of the planting and cultivation by hand. This is partly because on a really small scale setting up a tractor cultivator almost doesn’t make sense, and a lot of times it’s also because when you’ve never done cultivation with a tractor it can seem intimidating. Figuring out the equipment you need is intimidating, driving over your crops on a big tractor with pieces of steel that will potentially kill them is intimidating, and somewhat rightly so as the inevitable learning mistakes could be catastrophic.

The truth is you don’t need a special cultivating tractor to get started learning how to cultivate with a tractor, and you can set up a simple and effective tool bar for well under $1000, new, that can save much more than that in labor costs within the first year, even on operations that are just a few acres.

Before You Set Up a Tool Bar

There are a number of factors that make cultivating with a tractor -or by hand- much easier. Mechanical cultivation, whether with a hoe or a tractor, is much easier if your beds are relatively trash free: no clumps of un-decomopsed organic matter, old vines, or root stumps still hanging out. A relatively even soil texture, without big clods or rocks, and with a little soil moisture but relatively dry helps. An even, flat bed surface with plants in straight, even rows also makes things far easier. None of these things is particularly difficult, or what I’m going to cover in this post, but definitely keep them in mind.

My recommendation is to not get hung up on wanting to cultivate the space close to your plants when you first start, think about the big open spaces that can take up a lot of the field when plants are young, especially the pathways. The easiest place to cultivate, no matter how experienced you are, is between the rows, and especially in the pathways. This might only be 1/4 to 1/2 of the total area, but still, you’ve just cut your hand hoeing/weeding time and work potentially in half.

A Basic Tool Bar

From the back of this 30 HP utility tractor. This is a simple double tool bar set up to hill potatoes, but that can also be used for crops like tomatoes and is easily reconfigured for other jobs.

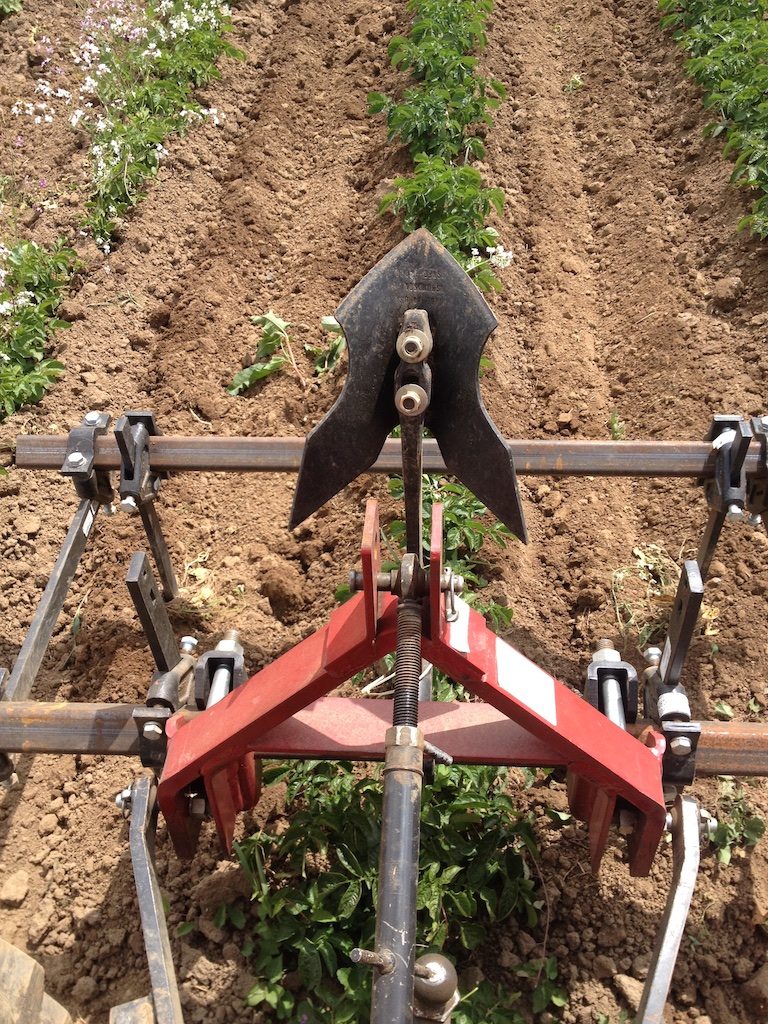
The two photos above (one at the start of the post and the one immediately above) show the same tool bar from two different angles, and I’ll include a photo below with yet another angle. On the outsides in the back are what I call sweeps and these are 9″ sweeps if I remember right. On the front bar there are two 12″ furrowers (people have different names for these same parts and there’s definitely variation in patterns from manufacturer to manufacturer). There is a third 9″ furrower that is mounted upside-down in the center. Mounting tools upside-down is a convenient way to store them completely out of the way when they’re not being used, especially if you might switch set ups out in the field.

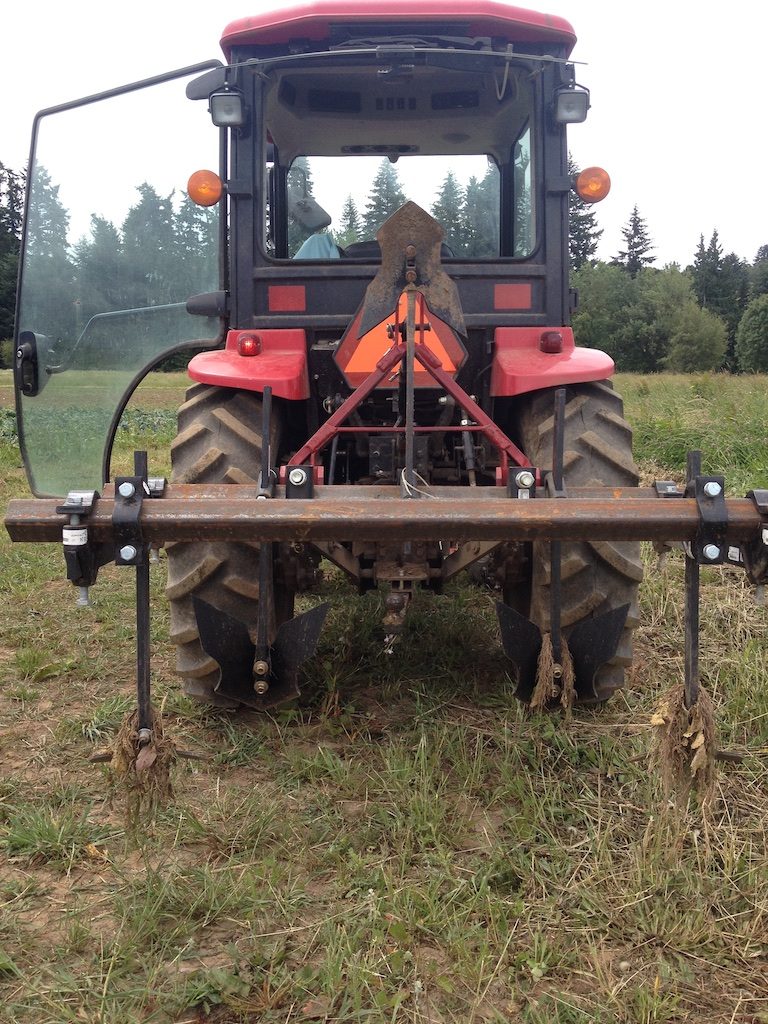
The basic parts here are those “shoes,” meaning the furrowers and sweeps, the “shanks” that the shoes are attached to, the clamps that clamp the shanks to the tool bars. The bars themselves, which in this case are referred to as “diamond bar”, which is just square tube rotated 45 degrees. I’ve used four additional clamps with two straight shanks to offset the two tool bars and the front tool bar is mounted on a red A-Frame, which is the standard mount for a category 1 3-point hitch. The number after “category” refers to the sizes of the  3-point hitch, but category 1 is the most common size on small farms, sometimes category 2 when you get up into the 50+hp range, or category 0 if you have a really small tractor. If you have a really old tractor it probably has some other implement mounting system as the three point hitch wasn’t common until the 1960’s.

A strange note on diamond bar is that many clamps are made for 2 1/4″ diamond bar, but 2 1/4″ is not a standard size square tube that most steel yards carry so you usually are better off using 2″ for smaller tractors, and that usually works with most clamps. Some clamps work better with 2 1/2″ and that’s more appropriate for very heavy soil and wide tool bars. Most tool bars are hollow (a.k.a. square tube), with at least 1/4″ or 3/8″ wall, but when extra down pressure/weight is needed sometimes solid bars are used. They are extremely heavy and proportionally more expensive as plain steel is essentially a commodity sold by the pound.

There are lots of variations on all of these parts, especially the shanks, so you want to make sure when you’re buying the separate parts that they’re all compatible. Usually there’s quite a bit of cross compatibility. The shanks for the sweeps and furrowers have a special end for mounting the shoes on them and they need to be mounted with special bolts called “plow bolts.” These usually aren’t available at hardware stores anymore so you’ll need to get them from the same dealer you get the shoes and shanks from. Using a flat washer and and split washer on the back side of the shank with the nut for the plow bolt will keep the nut from vibrating loose.


Another view of the tool bar from the side

This particular set up was for hilling potatoes. The plants at this point are still short enough that they might touch the underside of the tractor, but they’re not going to be damaged by that contact. The two 12″ furrowers are pointed and have plow like wings that direct the soil that is dug by the points up and off to the sides. The sweeps are flatter and don’t have wings so while they still dig a bit and move some soil to the sides, most of the soil flows over the blade.

The way this tool bar is configured the furrowers are moving soil into the row of potatoes, hilling them up. This buries weeds in the row, and also cuts, or drags weeds out of the path of the furrower, killing those too. The furrowers are also moving soil into the pathway, but the sweeps are following so they cut and drag weeds out of that path, and help flatten the pathway back out.

As you can see there was trash in the field and it’s now hung up on the shanks. The chevron shape of the sweeps helps move most of the trash off to the side, but when it hits trash straight on it can get hung up. Depending on the speed and depth that the sweeps are run at, and the width of the sweep, they will have an effect on a swath of soil that is significantly wider than the sweep itself. I usually consider a 9″ sweep to cultivate a path about 12-4″ wide, and a 5″ sweep a path about 9″ wide. Going slower and shallower makes this narrower, faster and deeper makes it wider.

In general I find it better to use more smaller sweeps rather than fewer wider sweeps, but to offset them, alternating between the front and rear tool bars and to overlap them slightly to make sure you cover all of the ground. This offsetting front to rear leaves gaps in the front row and the back row and those gaps allow any trash or clods to flow around, while still killing all of the weeds. It also leaves a flatter surface, and is less stress on the individual shanks and shoes.

Side knife with my foot for scale. This knife is rusty as it’s been out of use for a bit. In general the rust will usually wear itself off with use within a hundred feet of use or so and the knives and sweeps are pretty much self sharpening so I just leave them as is and only clean them when they have a lot of caked on soil. They do work much better, especially in slightly wet conditions when they are shiny, so a protecting them between uses by scraping and wire brushing off soil and then protecting them with a coat of grease or heavy oil, or even a layer of paint isn’t a bad idea (a common practice on plows) and will help them last longer. If you use grease or oil you should wipe it off before taking the blade out in the field, paint will wear off in the field.

Another kind of tool that’s a little different than the standard sweeps and furrowers is a side knife, sometimes also called a beet knife. On the same tool bar shown above I can swap out the furrowers for side knives. If the knife is angled away from the row, with the shield running a few inches from the row of plants, it can be run just an inch or so under the surface and will move a little soil away from the plants, taking out weeds at the same time. For a single row of something like kale, or cabbage, or small tomato plants, this leaves a narrow strip of in line weeds just a few inches wide to clean up with a hoe. When the plants are a little larger I can turn the knives around so they move soil into the row, slightly burying the bases of the plants, and burying small in row weeds. Again, I run the sweeps in the pathways to keep those clean.

Making Adjustments

There are a number of ways to adjust the shanks, knives, and tool bars. I’ve talked a little about the position of the shanks and shoes on the tool bar, alternating between the front bar and rear bar, and overlapping the pathways a bit to take out weeds. To start, I usually leave a 5-7″ gap where the crop plants will pass through, or more for someone just starting out. The gap needs to be wide because it’s impossible to drive completely straight, although you will get better at this with time and dedicated cultivating tractors with belly mounted implements can help you get a little closer. The other reason the gap needs to be there is because the tool will throw a little soil into the gap, making it narrower than the way they tool is actually set.

Vertically I usually set the shanks about 3/4 of the way extended. Shorter is stronger and stiffer, but reduces the clearance for the plants passing under the tool bar. Fully extending the shanks is weaker and more flexible, risking bending the shanks and also reducing the ground clearance when the tool is lifted out of the ground.

You may notice that on the potato hilling tool bar the pathway sweeps are set a little deeper than the furrowers for hilling. This is because in this particular case the potatoes were already hilled a bit and so the path ways were lower than the shoulders of the bed where the furrowers were running. In general running the tool within the top two inches, is best.

On some sweeps and knives you can adjust the angle of attack, either setting the point so that it angles down slightly, or up slightly. Setting it with the point down will help it penetrate hard soil and dig in more, setting it flatter works better in loose soil where you can run the blade evenly shallow without the tool jumping out of the soil and skipping sections. You can also change this angle of attack by adjusting the top link on the 3 point, but you’ll have to make further adjustments to the length of the shanks between the front and rear tool bars to make sure all of the tools are running at the desired depths.

Driving Considerations

When you’re driving a tractor with the tool bar off of the rear 3 point when you start turning left the tool will actually initially move right, and vice-versa. Turning much with the tool in the ground is a bad idea as it puts lateral forces on the tools, and they aren’t designed to take those forces which means you’re likely to bend or break parts. Turning slightly to follow a row is inevitable, and the only trick here is to do it as subtly as possible, paying very close attention and making changes slowly. You will quickly learn how much better this works when the beds are formed and planted straight, without wiggles or curves.

You also need to pay constant attention to how deep the tool is running and make small adjustments with the 3 point lift arms. You can add gage wheels to set depth but this adds a layer of expense and complexity when setting up the tool and doesn’t completely eliminate the need to pay attention to what the tool is doing.

Start by driving very slowly while you get used to paying attention to both how straight you’re driving and how deep the tool is at any particular moment at the same time, and how to adjust those things on the fly. Eventually it will become ingrained and you’ll be able to drive faster as the micro-adjustments needed become second nature.

If you have 4 wheel drive on the tractor, especially if you’re on a slight side slope (side slopes make everything trickier), putting the tractor in 4 wheel drive can help you keep the tractor straighter, but take it off for the turn arounds at the ends of the rows.

Drip Tape Considerations

Aside from the need to make sure the tools clear the header at the beginning of beds, I’ve never had trouble cultivating with drip tape in place. Part of the trick is to make sure that the tape is straight before you start cultivating. The only other trick is to just pay attention and make sure you never snag it, and if you do you stop immediately and sort things out. For the most part the tools run under the tape and never touch it. (This is not true for rolling cultivators, which I’m intentionally not talking about here.)

Setting the Toolbar Up for Planting

The same tool bar set up for planting potatoes

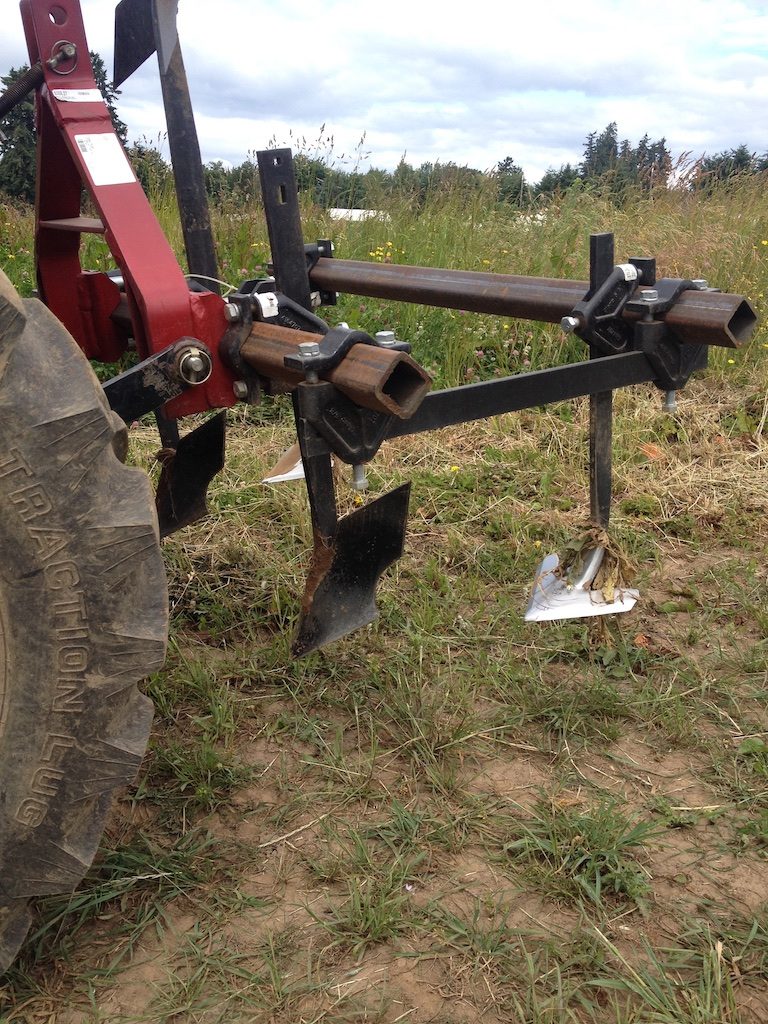
By moving around a few of the pieces the same tool bar I showed above can be used to plant potatoes, and potentially other crops as well. The center furrower is now dropped to create a furrow for dropping the potato seed pieces into. The two larger furrowers are flipped because they’re not in use, and the sweeps are moved in tighter to full the furrow back in after the seed pieces have been put in the furrow.

The view from directly behind

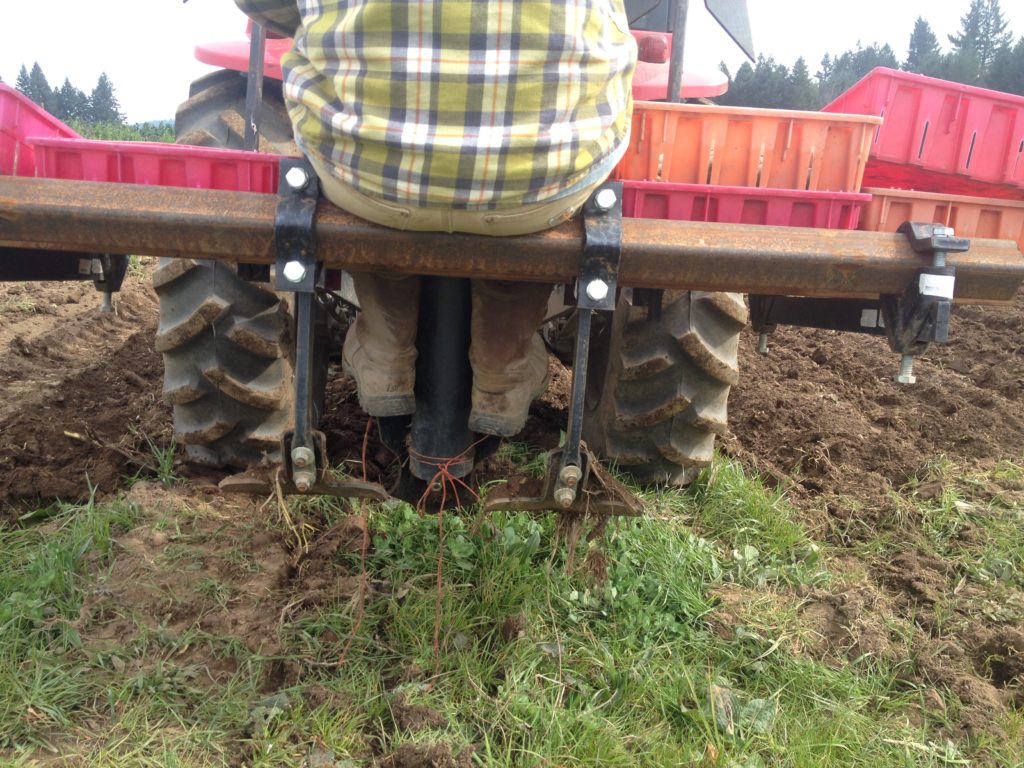
If you look closely at the photo you can see that a 4″ ABS pipe is tied to the back of the shank of the furrower. Seed pieces are dropped down the pipe and if you’re using 12″ spacing the lugs on the rear tires are conveniently 12″ apart, meaning you drop a piece every time a lug on the tire rolls past some set point on the tractor.

A board sits between the tool bars and acts both as a seat for the planter and a place to stack totes of potato seed pieces. You want to have excellent communication between the planter and the tractor driver to make sure that everything runs smoothly and safely.


For more ideas and lots of photos of cultivation tools I have a photo page with lots of captioned photos of tool bars, cultivation tractor set ups, and even hand tools here.

Summer Cover Crops


Buckwheat germinating
Buckwheat summer cover crop germinating

The other day I sat down with Louis at Our Table Coop to outline a cover cropping plan for the summer. For the past 15 years I’ve been using two basic cover crops here in the Northwest for filling in summer gaps in the field: buckwheat and sudan grass. I’ve experimented with a few others and I’m continuing to experiment, but those two are solid and each has a particular place. Creating the summer cover crop plan is pretty simple using those two crops, once the crop plan is mapped out, which I usually have done in December or Januay. The whole process of figuring out what beds would get buckwheat and which would get sudan, and how much of each we needed to order was done in about a half hour. Here’s are the basics of my approach.

Buckwheat gets planted anywhere there’s at least an eight week gap between crops starting in May. Sudan gets planted anywhere there’s more than a ten to twelve week gap starting in May. Gaps are easy to see on the map, they show up as white blocks and you just have to count the number of blocks between the last planned crop (or the expected maturity of a winter cover crop, usually mid-May to early June, and a late planted crop).

_DSC6606 - 2011-08-20 at 09-57-58
Sudan cover crop


I have these kinds of gaps for several reasons and in other parts of the country they might not be as common. We’re typically cropping nearly all of our ground at least once, if not twice a year. Even then we can have blank gaps because our planting season is so long, starting in February and going until October in the field. Some of our cash crops are finished as soon as early April so there’s plenty of opportunity to build soil biology and organic matter and to keep nutrients cycling high in the soil profile by using cover crops in the summer.

A Few Details

Buckwheat takes between four and six weeks to start flowering and it starts setting seed shortly after it starts flowering, within a couple of weeks. The flowers are obvious and white so it’s kind of like a flag saying, “turn me in, now!” It goes faster with longer, warmer days and slower earlier and later. In either case it’s not going to last much longer than six weeks at the outside, and with four weeks, even if it isn’t flowering yet it will already have decent growth in most cases. I like to give a cover crop four weeks to break down before planting, therefore the minimum of an 8 week gap. If it’s less than 8 weeks, I’ll usually just let the weeds go for less picky crops, like tomatoes, or do a bare fallow for trash sensitive crops like carrots or salad greens.

Buckwheat flowers
Buckwheat flowers

That four to six weeks to flower is about as fast as any weed, but weeds aren’t as kind as the buckwheat and they don’t signal that they need to be mowed before they set seed in the same way. This is one of the reasons I like the buckwheat. Even if the patch is very weedy, those flowers give me a visual signal that I need to mow and incorporate or I’ll have seed setting, buckwheat and weeds.

I usually use a seeding rate of about 60-80 lbs per acre and I either broadcast it with a “belly grinder” (shoulder bag type broadcast spreader), or put it down with a drop spreader. It needs to be incorporated and a ring roller works well, or a shallow disking, or slowly dragging the rototiller over the bed with the pto off. I don’t worry about letting the previous crop break down much after incorporation before seeding, although it’s nice if it can be a week or two after the inital incorporation.

I’ve used all sorts of sudan grass and I’m not particular but I prefer the smaller stemmed types like Piper. In the past it’s been important to specify untreated seed as the seed is commonly treated with fungicide, at least in our area. I have an impossible time finding Organic buckwheat or sudan seed, which makes me think I should start growing it myself. Immediately after that thought I start thinking there must be some reason no one is growing it organically for seed on a small scale and that I’d probably find out why if I tried to.

The sudan starts out a little more slowly than the buckwheat, but it can be maintained essentially indefinitely with mowing, at least until first frost when it will die. I use the same seeding technique as with buckwheat, and go a little heavier, maybe 80-100 lbs per acre. It varies quite a bit how long it takes, but whenever the suday starts to elongate, as if it’s about to send up seed heads, I mow it short. This is usually timed pretty well to knock back any weeds starting to set seed as well. It’s possible to keep mowing it weekly and to maintain a sod, I’ve done it to create alleys in summer squash and melon plantings, mowing regularly with a flail mower, but if I’m just using it as a cover crop I’ll let it go until it is about to head out again before mowing it a second time.

Sudan used to make sod aisles between rows of summer squash
Sudan used to make sod aisles between rows of melons

Even though we don’t get any rain in the summer I only ever irrigate these cover crops once, giving them a little over an inch immediately after seeding. There is no question I’d get more biomass if I irrigated more. Whenever the crop is on the edge of a sprinkler irrigated crop and it gets over spray it gets significantly larger. To me, it’s not worth the extra work, or the extra electricity and displacement of limited water resources to get the extra biomass, and I still get good growth and coverage. I do water again after incorporation (or just before if it’s too dry to work in, which is usually not the case as the plants seem to keep the water pumped up into the upper levels of the soil). I water after incorporation to help it break down and to germinate any weed seed that is near the surface during the four week wait before planting a cash crop.

_DSC0850
A field of winter killed sudan


How to Complicate Matters

I really like grass/legume mixes, as the grass and legume are complementary. The grass is good at taking up soil nitrogen, which encourages the legume to work with rizobacteria to fix more nitrogen from the air. The two nurse each other, and the upright structure of the grass provides a scaffold that helps any legume to climb and make more bio-mass without shading itself out.

The legume I’ve had the most success with in Sudan is clover. There are two ways I plant clover with sudan. I have had some success seeding it at the same time as the sudan, although I usually do this in separate passes since the seed sizes are so different it’s hard to mix evenly, and they don’t throw the same distance from a broadcast spreader.  This works ok, but the sudan tends to outcompete the young clover, which isn’t well suited to the hotter, drier time of year. The other way I seed it is to wait until a mowing in September and then to broadcast the clover seed over the mowed sudan. It usually starts raining soon after this and the clover comes up sheltered by the sudan, and then takes over in the winter when the sudan dies back, providing more growth and cover through the winter.

OLYMPUS DIGITAL CAMERA
Crimson clover


There are two clovers I use: crimson and red. I use crimson if the field is going to be turned in in the early spring, especially if the next crop is sensitive to trash. Crimson clover is easier to kill than red clover, and this works especially well because the sudan is mostly broken down by the late winter and the lush clover works in easily.

I use red clover if the field won’t be planted until later the next summer, or even fall, as the red clover is a weak perennial and is deep rooted enough that it can be mowed at flower and continue through the following summer with no supplemental irrigation if needed.

More Complications

For a while now I’ve been wanting to try sunflowers as a summer cover crop alternative to sudan. Mostly I just think this would be a pretty alternative, but I also hear that sunflowers can create significant biomass.

I somewhat consider my plantings of dry farmed popcorn, flint corn, dry beans and winter squash as a summer cover crop. They are very low input since they’re not irrigated, and low yielding, but they give an excuse to keep the field clean and they provide cover all summer. There is significant biomass above what is harvested. I haven’t done it yet, but every year I think I need to spin on some clover when the squash starts to die back to provide more winter cover. I have friends who do this before the canopy fills in in early summer, but they’re irrigating with sprinklers so it’s a very different situation for them. We finish harvesting the field too late to get it worked up for our typical rye/vetch winter cover crop, or at least it always feels that way.

A lot of folks talk about the wonders of mustards and forage radishes as cover crops, and for orchard or grain situations I can understand that. For vegetable production, particularly in a place where brassicas are so important as a cash crop and club root is such a big problem when rotation are short, I can’t see incorporating a brassica as a summer cover crop. Although, similar to the corn, beans and squash, I do think of high density salad greens, which are largely brassicas, as a great cover crop. I frequently let these go to flower before turning them in, which probably doesn’t help with club root problems, but it does provide beneficial habitat and is essentially a free cover crop since it’s already planted and it will still grow thickly after harvesting.

Things I’ve Tried

I’ve tried a few other legumes. Cowpeas never did well for me and I think we’re just too cold for them. I did have a good crop of soybeans one summer, using old edamame seed, but someone told me they’re hard on the ground, and the seed isn’t cheap so I abandoned the thought in subsequent summers.

As much as I like the idea of super diverse cover crop mixes, the simplicity of the variations I have now means they actually get planted and are easy to manage. I think that’s a good starting point for anyone new to cover cropping and it’s way better than the alternative, which is bare, or weedy ground.

Covering Ground

OLYMPUS DIGITAL CAMERA
Beds covered with clear greenhouse plastic to speed early season germination

I was listening to an interview with Jean-Martin Fortier on The Ruminant podcast earlier today where he was talking about his use of tarps. I’m not a big fan of plastic, both from an environmental and an aesthetic standpoint. Jean-Martin is a little flippant about it, but I think he’s right when he says we just need to get over our aversion to plastic as market gardeners. I’ve had similar discussions with Tom Denison in the past and Tom’s insightful and experienced attitude is that the reality is that the amount of plastic used for covering ground is actually pretty small due to the very thin films and even the tarp thicknesses that are used and that even though it’s not ideal, it does make the soil texture underneath pretty amazing, it suppresses weeds reducing needs for further disturbance of the soil (and the resulting diesel and/or labor), and the plants respond well to it, increasing yield per space.

I don’t use much plastic, but Jean-Martin’s discussion of how he uses tarps is inspiring and also reminds me of a technique that I used to use when I was growing on a smaller scale than I am now, although it could be used on a larger scale too.

In the early spring here in the Northwest, the soil can be slow to dry out and to warm up, even though the temperatures are close to appropriate for planting pretty much through the entire winter. What I would do is to cover a bed with clear plastic (leftover greenhouse plastic scraps) to warm it up and to protect it from the rain, drying it out a little bit. Then I would prep the bed and seed it and put the clear plastic on. The trick was to take the plastic off just before the seed germinated so that I didn’t fry the seedlings, usually this was just a few days. This works well when it’s raining and overcast but you want to get early seeds in. If the weather is sunny and dry it’s not so necessary but the plastic can keep the moisture higher in the bed.

IMG_0973 - 2010-03-11 at 08-16-05
A day after removing the plastic from the beds the seeds have germinated. You can see in this photo how much drier the surface is where the beds were covered versus where they weren’t covered at the far end of the beds but there is still obviously moisture where the seedlings are.

It’s a little funny that I’m trying to keep the moisture of rain off of the seed, but in our climate here in the NW we have so much moisture in a typical spring that it’s better to moderate that moisture with the plastic, and it also helps to protect the seed from rotting or getting washed out of the soil. It’s also funny that the plastic, in dry conditions, has the opposite effect, and it keeps the moisture higher in the soil, essentially holding in humidity and improving germination that way.

I think I originally got the idea from Tom Denison who was probably telling me about doing something like that with early potatoes. I used it for mustards and other salad greens and definitely had much better stands early in the year when trialing it against uncovered ground or even ground covered with floating row cover.

Now I’m thinking more about how I can use JM’s tarping techiques effectively in our Pacific NW climate and also about the possibility of going back to using some of the clear plastic on some of our early salad seedings. The goal here would be to offset the plastic’s environmental impact by reducing our tractor useage, and increasing our yield per bed (which is essentially also reducing our tractor useage).

A Second Look at No Till (repost)

Below is a post from November 10, 2008, that was originally on a now defunct blog. I still haven’t gotten around to playing with no-till in the years since then but I’m partially posting this because there seems to be interest. I’ll put a few additional thoughts I have looking back at this at the end of the post.

I just got back from the Washington Tilth Producers annual conference in Bellingham, Washington, where Dr. Paul Hepperly of the Rodale Institute gave a keynote address on no-till and then followed it up with a question and answer session that was very informative.  About five or six years ago I spent two seasons trying to get no-till garlic to work.  Those experiments definitely turned me off from no-till in vegetables but Dr. Hepperly’s talk, even though it was on a grain rotation, actually gave me some hope that it might work in a few specific vegetable crops.

When we ran the garlic trials, three farms went in on a SARE Producer Grant.  47th Ave. Farm, Praying Mantis Farm, and Sauvie Island Organics all tried to establish thick stands of sudan grass, plant garlic into the cover crop, and then use the winter-killed cover as a mulch to suppress weeds.  This did not work for us for a variety of reasons, all reasons that Dr. Hepperly’s system avoids.  Also, as an aside, the Producer Grant turned out to be a lot of work for us to manage which made us less excited about those grants, but more excited about the Research and Education grants when the OSPUD project came around in 2005 (more on that in a future post).

The rotations that Dr. Hepperly was primarily talking about were field corn planted into a cover crop of hairy vetch and soybeans planted into a cover crop of cereal rye.  Not only were the cover crops providing all of the weed control, they were also providing all of the fertility for the cash crops, and, at the same time, reducing economic and environmental costs by limiting tractor passes and other inputs, and holding soil from erosion.  Perhaps the most amazing part is that they were out-yielding conventional tillage systems, consistently!

There are some important limitations to the no till approach that Dr. Hepperly described, and in the question and answer session he clarified that the entire rotation is not always no-till, when they have weed problems, or if other issues come up they need to till sometimes to establish strong cover crops.  I made a list of the points I recognized as important to making the system work:

Weedless cover crop

For cereal rye they seed very heavily, I think he was saying 150-200lbs/acre.  A fellow I was talking to at lunch also mentioned that instead of seeding in one pass at a heavier rate, two passes at right angles to each other at a more typical rate of 80-90lbs/acre give more early coverage in the field.  For vetch, since the seed is expensive, a higher rate isn’t used but winter kill oats are added for early weed suppression.  Buckwheat or other summer annuals are also possible, but the cover crop has to be an annual for the system to work.

Sufficient Biomass

To create an effective mulch there needs to be sufficient biomass, I think he was saying about 5 tons per acre. If there is too much biomass there can be problems as well but mostly it sounded like you just need enough so that there’s good ground cover when it’s killed.

Roll down at full flower

To kill the cover crop it has to be rolled down, preferably with a roller crimper, at full flower.  They’ve done some good design work on the roller crimpers and there are a lot of little details available on the web site.  A roller crimper is  available for sale from Buckeye Tractor whose equipment I’ve used and is well made.  

There are a couple of keys here: full flower, leaving the stalks attached to the ground, and crimping the stalks.  The window is narrow for achieving full kill, it has to be after full flower, but before the cover crop sets viable seed.  If full kill isn’t achieved the cover crop becomes the weed.  Leaving the stalks attached to the ground helps keep them in place when the secondary seeding or planting operation happens.  Crimping the stalks helps with more completely killing the cover crop.

Don’t expose soil when planting

The point of the mulch is to shade weed seeds and prevent them from germinating.  If your planter exposes the soil and leave a strip then there will be in line weeds to deal with.

Direct seeding only works with large seeds

Small seeds don’t push through the mulch so this only works with large seeded crops, or transplants.  Another important point with direct seeding is that the press wheels need to be be heavy enough to provide good soil contact for germination.

The mulching effect has a limited time window 

The mulch starts to break down immediately so the system works best when the crop provides a full canopy by the time the mulch has broken down enough to let weed seeds germinate.  

With all of this new information I’m re-inspired to try no till on a few vegetable crops.  Good candidates, I think, are winter squash, tomatoes, eggplant, peppers, fall brassicas, sweet corn, beans, and melons.  The trick, it seems to me, is to find crops where the planting dates roughly match the flowering dates of a cover crop, and that will provide a good canopy later in the season.

On small scale plantings this systems seems like it would require very little investment in equipment for trials.  Crops can be crimped with a 2×4 and some string, and transplanted or seeded by hand or jab planter.  On a larger scale more might need to be invested in a roller crimper and no till seeder or transplanter, but the roller crimper is not terribly expensive and modifications can be made to existing equipment to make them work in no till situations.

February 2015 – Additional Thoughts

Here in the Northwest I think there are a few drawbacks to thinking about no-till systems that are specific to our climate. No-till systems tend to help keep ground moisture and to keep the ground cooler. In hot and dry climates this is a big plus, but for us here in the Northwest we are almost always hoping to warm things us and dry them out a bit so the heavy mulch of no-till can be counter productive in all of the potential crops I mention above. Slugs and voles are also problematic in my area, particularly when there are damp conditions and there is ground cover. Bare soil in the field helps control both of these pests whereas mulch exacerbates the problem.

Another note that was left out of the original post, the Rodale system wasn’t all no-till all of the time, but for certain years of the rotation there was no tillage. This helps break build up of perennial weeds that establish in no till systems, and also makes crops that aren’t appropriate for no till fit into the rotation system.

Growing Radicchio


chioggia radicchio
Chioggia radicchio cases ready to be shipped

On the last day of this past October I had the good fortune to visit T&T Seeds in Chioggia, Italy. T&T is a commercial seed company specializing in radicchio, but also offering all sorts of chicories and a number of other vegetable seeds as well.

I’ve been growing radicchio on and off for at least 15 years now but I’ve always felt like I was stumbling around in the dark a bit. Visiting T&T, specialists in radicchio, definitely shed some light on the topic and gave me a peek at some of the possibilities and techniques. I’m going to attempt to translate my notes and memories (two months later) of what the folks at T&T passed onto me. Usually I write about my own production experience but I thought other folks might find this information, which I don’t find widely available in the US, useful in their own experimenting with cool season chicories.


2014-10-31_TandTSeed__DSC8066
T&T Chioggia type chicories being trailed on a farm scale in Italy.


Radicchio

Most of the information I got was from one of T&T’s breeders, Andrea, who fortunately spoke excellent english and was obviously very familiar with the regional production practices and especially with the varieties that T&T sells. We started by talking about early, or “precoce,” types (as opposed to late or “tardiva” varieties which are produced differently). The production practices he was showing us and was describing were on farms fields that were probably 15-30 acres of radicchio rotated with crops like wheat, corn, beans and maybe watermelons. This was conventional production and for wholesale markets, most of it for tight, full sized heads that would then be cut up for bagged salad mix.

2014-10-31_TandTSeed__DSC8063
Andrea, our super generous and informative guide from T&T. Andrea is one of the seed breeders at T&T.


For the Chioggia area both transplanting and direct seeding are used, but it sounded like transplanting might be slightly more typical, and certainly wasn’t uncommon. Plants were grown in plugs and planted out at three weeks. Direct seeded crops were seeded a few days later than the plug trays were seeded since there would be no transplant shock. Holding plants in plug trays longer than three weeks was not recommended as it causes problems with the roots which in turn causes uneven maturity. Spacing for plants, direct seeded or not, was about 12-14” in line and about 18” between rows. When plants were direct seeded they would be thinned in the field to make sure the spacing was even. On the farm we saw, the soil appeared to be clay loam. It sounded like irrigation is primarily with natural rainfall but sometimes by big gun. We did see drip lines at their research farm, which had sandy soil.

2014-10-31_TandTSeed__DSC8089
New variety trials at T&T’s home fields.


Timing for planting depends on the variety and the desired harvest date. The shorter maturing varieties are transplanted from the beginning of August to the middle of the month and were harvested from the end of September into November. Longer maturing varieties are planted from mid August to the beginning of September and are harvested from November possibly into February.

2014-10-31_TandTSeed__DSC8059
A field of Treviso type radicchio in early November in Chioggia.


When I was thinking about how this compares to my experience here in the NW, I’m not as aware of the relative maturity type of the varieties that I’ve grown (something I’ll start paying more attention to), but it seems to me they probably plant a week or two later than I do and this is probably due to warmer nights and faster growth early on. The latitude is almost the same so it’s not about day length (although we might not get as much sun later in the season due to clouds).

Harvest timing is based on the head maturity. Heads are typically harvested when they are full and solid. If they are over mature they have a tendency to rot a bit at the leaf edges, requiring more cleaning and loss of weight. If there’s a threat of hard frost they might harvest slightly immature with a bit of green still in the wrapper leaves and leaving an inch or so of root attached. They are then stored for a few days to a week and the heads finish maturing in storage (I’m not sure if this is at a slightly higher temperature than typical storage or not but I would assume so).

Tardiva varieties are grown very similarly to precoce but they are harvested differently. They are dug with the root and then forced in flowing water (or water that is regularly changed). There is a great video on this process here. I’ve heard rumor of folks over here doing this successfully in buckets on a very small scale, changing the water every few days instead of using flowing water.

2014-10-31_TandTSeed__DSC8108
A beautiful head of chioggia type radicchio in the field. The outer leaves have been pushed down to reveal the tight head.


There are three basic shapes for the precoce radicchio: Chioggia, Treviso, and Verona. The Chioggia shape is completely round, Treviso is long and upright, and the Verona type is half way between with a round bottom, but a slightly pointed tip.

The typical radicchios are red and T&T has a particular deep color red that they select for. They also sell Castlefranco, and Lusia which are red flecked green varieties, as well as a completely green variety. According to Andrea, older varieties of Castlefranco were typically harvested and then blanched in cow barns on straw for a few days to a week. They were then watered which opened the head into a rosette. Modern varieties are tight which makes them self blanching in the field, but not open at harvest so they are typically peeled back slightly at harvest to display the same rosette as the old varieties. Sometimes Lusia or the green varieties are harvested in the same way and passed off as Castlefranco.

2014-10-31_TandTSeed__DSC8062 - Version 2
I believe this was a Lusia type that Andrea had peeled back in the Castlefranco style.


Here in the U.S. we typically have one or two varieties available from a seed company in a particular form. T&T has three Sugarloaf radicchio varieties available (one of my favorites), a 75 day, a 90 day and a 120 day. If you want a standard red Chioggia type, they have 10 available ranging from 55 to 160 days. It’s easier to think about extending harvest with that range available. This year I’m trailing seeds from T&T but I also looked around and found varieties I wanted to try from Wild Garden Seeds, Adaptive Seeds, Uprising Seeds, Seeds from Italy, High Mowing Seeds and Johnny’s Selected Seeds. Osborne Seeds is the main importer of T&T seeds here in the Northwest. I’ve heard from them, and from other growers of T&T varieties that they are exceptionally uniform for radicchio so I’m curious to trial them against other companies.

In Italy, when fields are harvested they are gone through once, or maybe twice, and the typical yield is 80 heads out of 100 heads planted. In poor conditions it can take 4-5 harvests to get that yield. The heads of Chioggia we were seeing there were about 1lb each, beautiful and tight. My yields have been significantly lower than that here in Oregon, although I also have very heavy vole pressure and have found that voles prefer radicchio over most other winter crops.

2014-10-31_TandTSeed__DSC8055 - Version 2
Chioggia type radicchio is given a final cleaning in a big tank of water before being packed into styrofoam flats for shipping.


Spring Production

I wasn’t very interested in spring production so I didn’t ask much but Andrea did mention it a few times. Apparently they use the shortest day varieties to produce heads in late spring before temperatures get too hot.

It does seem that radicchio is produced in many areas now, and by moving north and south the harvests can be extended. A helpful chart in their catalog shows planting and harvest periods by variety for four different regions of Italy with seeding dates ranging from mid May to late July in the most Northern mountain regions, and mid July through mid August in the South.

Other Chicories

We talked less about other types of chicories but we did see escarole, endive, catalogna, puntarelle and a few other specialty types of radicchio including a beautiful light rose colored one. According to Andrea they do have different day length varieties of the escarole and endive, but they are planted more like lettuce, with successions to spread out the harvest. The endive is banded 3-5 days before harvest to blanch, although some of the varieties are partially self blanching. They are selecting a puntarelle for more northern production but most production is currently done farther south, near Rome, and the timing is very specific, by variety, to get fat stalks.

2014-10-31_TandTSeed__DSC8067
Lane Selman, @culinarybreedingnetwork, taking notes on radicchio in the fields.


Thank Yous

A big thank you to Jason Salvo @jasonsalvo for the initial contact information for T&T. During our visit @culinarybreedingnetwork and I were posting photos to instagram and there was some great conversations on production here in the US in the comments. I also want to thank Chris Fields @camporossofarm and Alex Wenger @thefieldsedge. Apparently there are some folks here in the US who are growing really beautiful stuff, maybe even surpassing what’s happening in Italy in some cases, but certainly without the same demand or big production.

Strawberry and Asparagus Approaches

Zoë

Usually I just post about my own experiences but today I added two pages to the Q&A section that are responses to my own questions that I asked my good friend Zoë. Zoë and I worked together for several seasons a bunch of years ago before she moved home to the South Coast of Oregon and started farming there on her mom’s land. I love visiting her amazing operation, tucked in a beautiful valley just up from Highway 101. She, her sister, and her mom all combine their marketing efforts under the name Valley Flora Farm.

My questions were about her use of weed cloth, also called weed mat, in strawberries and asparagus. Her answers were concise and very helpful for me. I thought they might be helpful to others as well so I asked if she minded if I posted them and luckily she didn’t.

Tractor Cultivation

I just added an article on basic tractor cultivation to the q&a section of the website. This is a version of an article that was first printed in Growing for Market in 2008. All of the articles that I’ve written for GFM are available in their online archives, which are accessible with an online subscription.

Three Sisters (reposts)

Reading a blog post from a friend of a friend’s farm this morning I was inspired to repost these two entries from 2009. The weather hasn’t been as conducive for these crops since that year (read, the weather has been downright terrible for those crops since 2009), but I have still had some success. I don’t really have enough space to play with this technique the way I’d like to, but I really think it has a lot of potential. Unlike the Kerr Center example linked to in the blog referred to above, I have been able to use the standard seeders and cultivating equipment and so there really isn’t much in the way of drawbacks, mostly just benefits.


The Three Sisters July 16, 2009

Pretty much every american grower it seems has heard of the three sisters: corn, beans and squash.  Andy Griffin mentions this planting scheme in his recent excellent post “Corn,” in the ladybug letter.  Earl, the chef at Meriwether’s, convinced me that we should try growing a block this way and we had some space so we are.  We’re doing it a little different that the “milpa” system that Andy talks about, everything for us is in rows.  We seeded the corn first, a type of popcorn actually.  A few weeks later we came back and seeded the beans, five types of pole beans.  Then a week or so later the winter squash was seeded, lots of trial varieties.

We’re also trying to grow these crops with no supplemental irrigation.  The property has limited water but abundant land and soil that holds water well and is deep.  So far everything has germinated beautifully, despite the lack of any rain and a stretch of hot sunny weather for several weeks before the winter squash was even seeded.  We’re raking the soil to keep weeds down and to create a dust mulch to prevent surface evaporation.  I’m hopeful that the crops will do well – meaning they’ll produce a modest harvest with minimal work.  I’m fairly confident but it’s still a long way to harvest in late summer.  I’ll let you know what happens.

Dry Farming August 11, 2009

Two months ago I wrote a post on the “Three Sisters.” Take a look back at those photos and then look at the one above.  Same field, and this field has seen no irrigation this season, we’ve had no significant rain since early May, and the above photo was taken a week after the week long 100+ degree heat wave.  All of the crops were direct seeded in this field but we also have melons in another dry section that were transplanted in June, and are ripening fruit now (pictured below).

The vine growth is not quite as vigorous as I would expect with irrigated vines, but there is good fruit set and so we’ll see how the yield and flavor turns out.  Part of the reason for experimenting with dry farming, meaning growing crops in a rain free summer without supplemental irrigation, was because we didn’t have much irrigation water so we wanted to save that for the crops that really need it, like greens.  I’m certain that we won’t get top yields per space, but I hope that we’ll still get top quality and we have definitely had to do very little cultivation and weeding, and no irrigation work.


   Besides the three sisters section and the melons, we’re also dry farming tomatoes, potatoes, dry peas and beans, spelt, flax, several corns and quinoa.  We’ve harvested half the potatoes with very good results, not a record yield, but respectable and good quality spuds.  The tomatoes are just starting and everything else is looking good with no real signs of water stress and very little weed pressure.  The corn pictured above is popcorn and the beans were a late seeding of flagolets, seeded in mid June to available moisture after a month of no rain.

One of the things that I think is allowing us to do this is the impressive water holding capacity and depth of the soil we have.  Even though the site is on a ridge top, 1000’ above Portland, Oregon, there also seems to be a few natural seeps so I suspect there are areas of the field where water naturally flows subsurface late into the spring.  On top of those things we have given the crops slightly more space than we would have if they were irrigated and early on we concentrated on cultivating out even very small weeds and leaving the surface soil loose to reduce weed seed germination and surface evaporation.

2012 Notes

A few follow up notes are appropriate here. My feeling on the three sisters planting is that it works best when it’s a corn that is for drying (popcorn, dent corn, flint, etc, not sweet corn), pole beans for dry beans, and hard squash. None of these crops require entry into the field while the other is fully filled out for harvest. Letting the squash fully cover the ground is one of the benefits, and that makes harvesting the corn and beans impractical before the vines start to die back.

Also, the terrible weather we’ve had the last two years has been cold, wet springs and early summers (and cold through the summer). In 2009 I did notice that the corn and squash we grew together did very slightly better than those that grew separately, the beans seemed to not do quite as well, but the there was absolutely no work done to trellis them so that was a huge labor and materials savings, and there is far more row feet of corn than we’d usually plant in beans so there’s no problem in seeding extra beans to make up for the difference. in 2010 and 2011 none of those crops did well anywhere for us. Also, the beans are essentially in the same space as the corn, so they are bonus income from the same space, not requiring any additional costs over seeding and harvesting – no extra field prep, no extra cultivation, no extra fertilization. They also didn’t interfere with hand harvesting the corn, and the squash was harvested before either of those two crops.

I also experimented a little in my garden and actually seeded the corn and beans at the same time. it seemed like the beans would outstrip the corn, but actually the corn was always just a hair ahead of the beans. I wonder if the beans were forcing it to grow higher by continually shading the lower parts. I’ve also been surprised that I’ve had no trouble with lodging.