|
|
|||||
 |
|||||
Q: How do I make wooden boxes for bagged CSA shares? (This post is on it's third update and the lid design has improved slightly from the orignal - the current version is from April 2015) |
|||||
A: Below I’ll step through the actual process from start to finish for making the wooden boxes I’ve been using for our CSA for over a year now (shown below). Before I get into the production details I’m going to give the background on how I came to this design which may explain a little more about why the boxes are made the way they are. |
|
 |
||
I’ve been packing CSA shares in damp Organic cotton tote bags for a while now (since 2008). Initially, needing a way to get the bags to pick up sites where members would collect their shares I fell back on wax boxes. Wax boxes aren’t so attractive, or durable, so I started to look for wooden crates that might work better and look better. The boxes make the bags easier to move in bulk and allow me to stack them so they take up less floor space. They also keep the outsides of the bags cleaner and prevent the bags, and vegetables inside, from drying out too fast. I like the wood because it breathes a little and doesn’t let puddles or condensation to form. |
|
 |
||
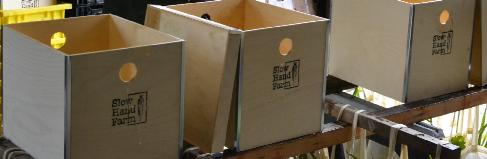
At the beginning of this process I thought back to boxes I had made, in the distant past, from something called redwood bender board. This is thin, light and wide enough to make a decent side to a box and it was relatively inexpensive. It’s intended use was as edging for gardens and it was thin enough that you could make long radius curves for garden edging, although in short lengths it’s relatively stiff and it’s very stiff vertically. Unfortunately all of the “bender board” I can find now is plastic, which is much heavier, more flexible and far less attractive. I was wanting to avoid plywood but it ended up being the best option. For a few years I used a wooden box that Ikea made (shown above) and this got me more comfortable with plywood as a material for the boxes. The Ikea boxes, in retrospect, we actually really excellent and I started using them because they were pre made for about the same price I could source the raw materials. They went together easily with nicely formed corners from galvanized metal, which also helped protect the corners. With the lids they also stacked, locked together nicely. For those boxes I left the wood raw and did a linoleum cut of my farm logo, printing the boxes using oil based printing ink. I used those boxes for three years at which point they were still mostly good structurally but were starting to get a little dingy. Unfortunately when I went back for more boxes Ikea had just discontinued them so I was stuck making my own, having not found another suitable wooden crate on the market. My design borrowed a bit from the Ikea design, and is a similar size, but without the ability to source the metal parts easily I rely on glue and staples to hold my boxes together. I also use 1x lumber for the ends which makes the staples hold better and also allows a bit more comfortable carrying handle. |
|
 |
||
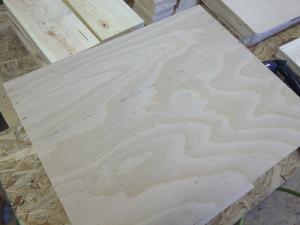
Materials Typically I try to design with minimal waste in mind and so when working with plywood I frequently size designs to minimize cuts and any waste strips. With these boxes I had a pretty specific size in mind as I was trying to fit them to the cargo bike I use for deliveries so I end up with a little more waste than I’d like, but the resulting box size has worked very well for us and the bags that we use. For the sides, bottoms and lids I used 3/16” plywood (nominally 1/4") and experimented with a few different grades including some very inexpensive stuff that I would not use again. My recommendation here is to get the highest quality plywood you can, preferably with five plies and relatively thick surface veneers which will be the wear surfaces. The really cheap stuff I got has very thin veneer which has started to peel and splinter over time, the higher quality (twice the price) stuff has been much better. For the ends I use 1x4 and 1x6. I also ripped lath from the 1x4 to make cleats for the lids. It would probably be better to just buy lath and not go through the trouble of ripping all of those cleats, although lath can be fairly rough so there’s some trade off there. For the lath I made sure to rip clean sections (no knots) but twists and warps didn’t matter so much. Materials List
Cut List - For one box:
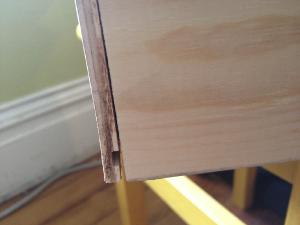
Making the Cuts The tolerances on the cuts are pretty tight if you want the boxes to go together easily and to have easily interchangeable lids. I didn’t get things quite right on my test boxes and it caused some problems later on (a bit of flaring at the edges is shown below). |
|
 |
||
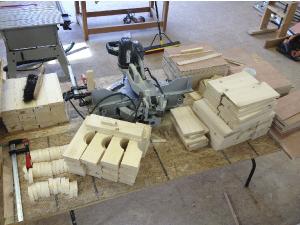
To cut the 1x materials I used a chop saw and made clamped a makeshift stop to the fence which made the process go very quickly. You can see the stop clamped to the chop saw below, along with all of the cut pieces for the boxes. |
|
 |
||
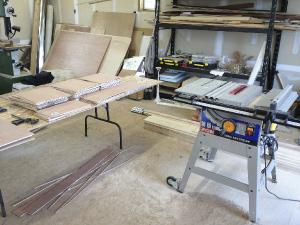
To cut the plywood I used a basic table saw with a fence and some roller supports to help hold up the sheets as I fed them. This was tricky with the small saw so I ripped the sheets roughly in half with a circular saw before doing this which helped a little. You will basically get 9 pieces out of 1/2 a sheet of plywood pretty much any way you cut it. |
|
 |
||
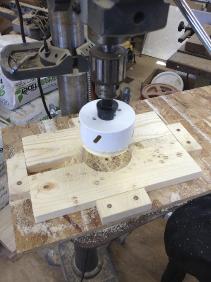
Half of the 1x4’s need to have cut outs for handles. I did this by making a jig for the drill press and then using a 4” hole saw to cut half moons out of two pieces at once (see the photo below) |
|
 |
||
For all of the 1x and plywood pieces I quickly sanded down the cut edges to keep them from splintering after all of the cuts had been made. The next step was slotting the plywood sides and the 1x4’s without the handle cut outs. This slot is what holds in the bottom. I made the slot 1/4” from the edge, 3/16” thick and 3/32” deep. To do this I used a router with a 3/16” bit (laminate trimmer). I used the fence on the table saw as a guide and cut a scrap to make a spacer so that the groove was in the right place. This was a work around as the table mounted router wasn’t working, but if I had one I would have used that. |
|
 |
||
I also drilled 1/4 drain holes in all four corners of the box bottoms so that the boxes couldn’t fill with water. In retrospect I probably could have made these holes a little bigger, maybe even 3/8”, although they really haven’t posed a problem they would just drain a little faster when we wash them out each week.
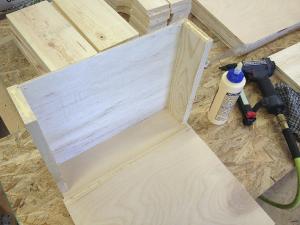
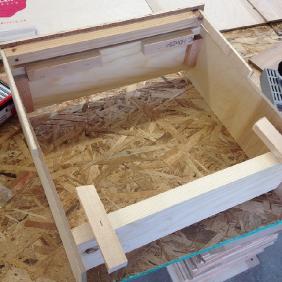
Assembly of the Box To put it all together first I’d lay a bead of glue in the grooves of the two 1x4 ends and one of the sides. Then I slip a bottom piece into the end grooves and stand it up on a dry side piece. Then I added two beads of glue to the end grain of the end pieces (shown below) and put the side piece with glue on top of that pressing it all into place. Holding it together tightly by hand I then put three staples through the plywood, into the end grain of the 1x4’s, using a pneumatic stapler. This holds it all together and works best if the staples go in at slight, opposing angles and not straight. As soon as that’s together I laid a thin bead of glue in another side piece and then flipped the stapled assembly upside down to staple on the other side. |
|
 |
||
 |
||
I did these boxes in batches so I’d do this step for all of them before going onto the next step. The next step was to lay thin beads of glue on the end grains of the 1x6’s and then the 1x4’s with handles and staple them in place, carefully making everything as flush as possible as I went. The first boxes I didn’t glue all of the pieces and they definitely have started coming apart so the glue is necessary, although I didn’t use a lot. I basically use 36 staples per box, which is 9 per corner or three per 1x. I don’t think you need more than that. They are helping hold things together but they’re almost more holding the parts together while the glue sets.
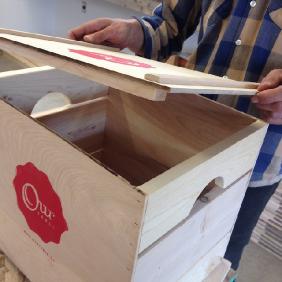
Finishing Touches The final step for the box was to take a 1/4” half round bit for the router and to route the handle hole, inside and out, and around the top inside of the box. This makes the handle more comfortable to hold and makes the lid go on more easily.
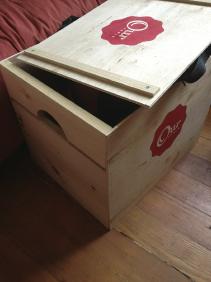
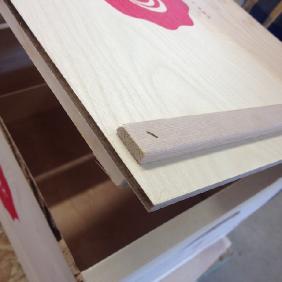
Making the Tops If you’re printing the boxes you might want to do that before you put the cleats on depending on how you’re printing. For the original version bcause it was simpler I made all of the cleats the same length as the ends. For this batch we've changed the lid design to help them stay on better and to make them stiffer and resistant to warping. The change is minor but the top cleats are essentially the same, just a 3/16" thick strip of wood that runs across the short edges of the top set in so that when you stack the boxes it keeps the box above from slipping around. The bottom side of the lid also has a cleat but it runs the long lenth and is thicker material, helping the lid to stay in place better. This also makes the cleats form a full frame around the edges, preventing warping. The original cleats were all just screwed to the tops and I didn’t use glue, although I probably should have as over time most of the very short screws failed. With the thicker material of the bottom cleats which still overlaps the top cleat I rebuilt a jig for holding everything in place and we can now glue the strips in place and then hod the corners tight with a staple in each corner. This should make a much more durable lid. The photos below show the jig and the new lid design. |
|
 |
||
 |
||
 |
||
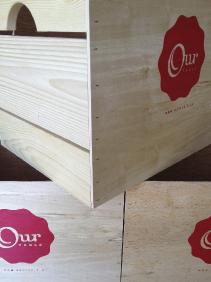
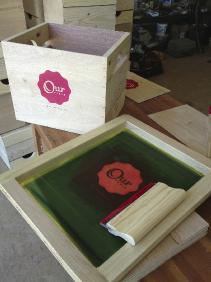
Printing the Boxes This was pretty easy. I had never screen printed before and it took a few tries but it seemed to work out in the end, mostly. I had trouble finding ink that seemed like it would be permanent on wood. I ended up using a water based ink and mixing in a fixer. It hasn’t been completely water fast, but we don’t really get the printed surface super wet and then scrub so I haven’t noticed much wear on the printing in the two years they've been in service. We had a screen made for us with our logo which cost about $50 or $60. I simply lay the screen on the wood and then use a squeegee to spread the ink across the screen. That’s it. Then it needed to cure for a week. I did this after all of the boxes were assembled and then just stacked the boxes in a wall for curing. I did the lids before putting on the cleats but used the cleats to sticker the stack for curing. I did have a little trouble with some fine print on the screen but I think some ink had just dried there and when I cleaned it with a bit of water the problem went away. It makes me wonder if it’s best to wet the screen before using it. This round we printed all of the sides and tops before assembly, which was very quick and easy. We used the 1x pieces to sticker the sheets so the printing could cure in stacks. |
|
 |
||
Two Years Later We’ve been using the boxes for two years and I still really like the design, not that it couldn’t be improved on. We get a lot of compliments on the boxes as well, even after two years of constant use. The corners are getting a bit beat up on some of the boxes and a few of the ones that were made with the cheaper plywood have peeled in places. All of the boxes are still usable but there are a few that need to be replaced. We spray them out with water and sometimes scrub out stains and then put wet bags in them most weeks. They dry out in the time between. They are a bit stained, mostly inside. Some of them have spent some time in the rain during winter cargo bike deliveries, but they are all still in good shape considering no treatment to the wood. The lids almost all need to be rebuilt as the cleats have come loose over time. I think some of them will last for three seasons, basically about 200 CSA deliveries. The failure is mostly in the plywood verneer peeling on the cheaper wood and on a few of them that weren't fully glued the staples need to be retightened regularly. My original estimates for cost are probably still about right. Materials for the more expensive boxes came out to about $10-12 a box. When I built them in batches of about 12 I think it took about 30-45 minutes per box from start to finish. This round was built with two people for some of the steps and having two people definitely made things like the table saw and printing easier, but I'm not sure it really sped things up significantly. |
|
I add to this site because I like collecting this information and I’ve found similar sites incredibly helpful. I hope this site is helpful for you, and if it is, please consider a donation to help me spend more time putting up more. Thanks! |
other places you can find me |
|||||||
 |
 |
|||||||