|
|
|||||
 |
|||||
Q: How do I make a rolling bed marker for a hand cart? |
|||||
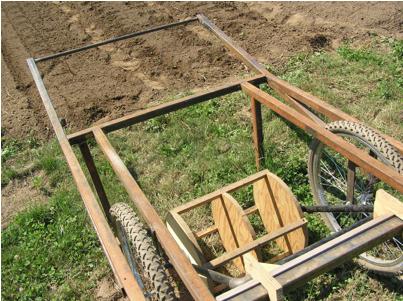
A: Here are basic directions for making a rolling bed marker for my farm carts. The idea is that the bed of the cart can easily be removed and replaced with a bed marker. For the past two plus years the folks at Skyline Farm just outside of Portland, Oregon have been using the first version of this marker to mark beds quickly and easily on their 1 1/2 acre vegetable operation. A big tractor mounted rototiller leaves a flat field and the beds are marked by pushing the cart while walking behind one wheel. The second cart wheel marks out the other pathway while the bed marker marks a grid that can be used for direct seeding or transplanting. Even though the farm is entirely cultivated by hand, having a quick way to mark out beds and plant spacing quickly saves a lot of time and helps the farm keep production results very even. |
|
 |
||
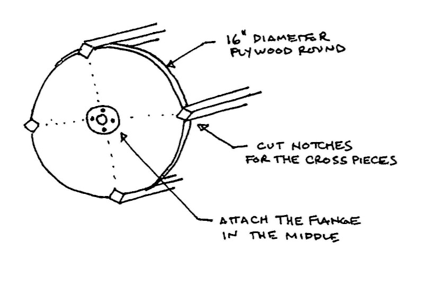
To make the actual marking wheels I use plywood. 1/2” CDX plywood is probably the minimum you’d want. The Skyline cart is made with 5/8” marine grade plywood. Thicker is better for this application. I mark out the rounds at about 16” diameter, which will let you cut three from the 48” width of a standard sheet of plywood with minimal waste. This is also very close to the 15.25” diameter that gives an even 4’ circumference. Having a slightly oversized round will actually give you closer to 12” spacing, as the wheels tend to sink slightly, changing the effective rolling circumference. To mark the round I use a scrap of wood with a screw point sticking slightly through. I then place that point in the center of the circle and hold a pencil vertically 8” from the center of the circle, against the scrap wood and rotate through the circle (a quick and dirty version of a compass like you used in geometry class). Then I cut the rounds with the jig saw. For the cross pieces I use an approximately 1” square piece of hardwood, like oak. These are cut to the desired length from outside row to outside row. In my case I have tight rows, 10” apart, and three to a bed so this is 20”. I add the width of the plywood, so it’s cut to 20 5/8” in order to place the rounds centered at 20”. Then I cut four notches with the jig saw, one every 90 degrees in each of the rounds. The notches let the cross pieces sit so that an edge points out. I flatten out that edge slightly just over the round to make it easier to drill a pilot hole for a screw through the cross piece and into the round. |
|
 |
||
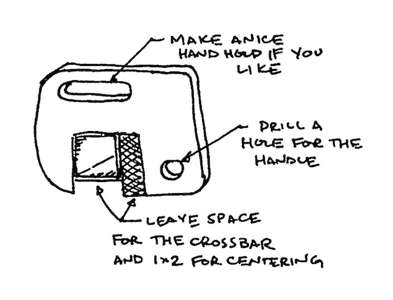
Once the four cross pieces are attached to the rounds I attach the axle stubs. For these I use metal plumbing flanges and 1/2” pipe nipples. Black pipe works fine, no need for galvanized. To attach the flanges to the rounds I use flat head machine screws and T nuts. Wait to attach the nipples to the flanges until the handle is made. Next cut a piece of 1x2 to match the inside length of your cart cross bar. It should fit fairly exactly, but not too snugly. You’re going to use this piece as the centering mechanism so you don't want it too loose, but it needs to slide in and out easily. To make the attachment pieces for the handle I cut two more pieces of plywood with the jig saw (see the drawing below). These pieces have notches sized to go over the square tube of the cart crossbar, plus the narrow dimension of the 1x2 you just cut for centering (1x2 is usually about 3/4” thick but it varies a bit so measure and try to get this pretty exact). They also have holes to accept the handle which can be drilled with a spade bit. If you want to make it easier to get on and off you might try cutting hand holds into the piece (I’m going to try this on my next version, but it works fine without). One tip on using a spade bit for holes that will minimize tear out is to drill through until the tip of the spade bit penetrates the far side, then flip the piece you’re drilling and drill from the other side using the small hole to center the tip. |
|
 |
||
The top piece of my handle is made from a 24” piece of 1/2” black pipe. I slide the two plywood pieces I’ve just drilled out over this and then attach two elbows. To the elbows I attach two more pieces of 30” pipe and to the ends of those pipes I use 1/2x3/4 T’s The 3/4 T’s will slide over the 1/2” axle stubs making a rough axle and bearing. This sounds very crude, and it is, but there’s no real load on this bearing and it works great, it’s cheap, lasts for ever and never needs any lubrication. So, once the handle is together and aligned and tightened, preferably with the pipe wrenches, and perhaps a bit of teflon tape or pipe dope to help lubricate the threads, then slip the 1/2 pipe nipples through and attach them to the flanges on the rounds. |
|
 |
||
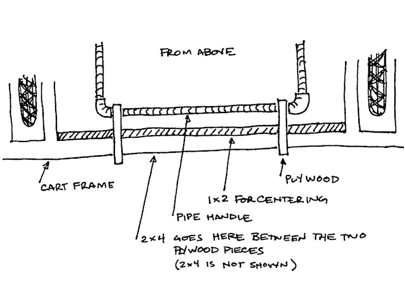
Now you have something that you could pull by hand. To finish it, take the piece of 1x2 and screw it to the inside of the notches in the plywood pieces on the handle so that the plywood pieces sit against the elbows. This will keep the mechanism centered when it’s mounted to the cart. The final step is to cut a piece of 2x4 to match the inside length between the two plywood pieces. Then insert this and screw it in place to support everything and keep it from coming apart. Simple. Keep it out of the rain if you want it to last longer. Tighten the screws very once in a while to make it last longer. I’ve never treated or painted anything. If I were going to treat it I’d probably just give the wood a few coats of linseed oil, which is relatively non-toxic. I’m working on a metal adjustable version, but we’ll see how that goes. I’d love to see your version if you make one and use it. |
|
Article added March 2013 |
|
I add to this site because I like collecting this information and I’ve found similar sites incredibly helpful. I hope this site is helpful for you, and if it is, please consider a donation to help me spend more time putting up more. Thanks! |
other places you can find me |
|||||||
 |
 |
|||||||
© joshvolk.com |
|